Vector Laboratories is closed for the President’s Day on Monday, February 19th. We will be back in the office on Tuesday, February 20th.
We will respond to emails upon our return. Have a wonderful day.
Menu
Vector Laboratories is closed for the President’s Day on Monday, February 19th. We will be back in the office on Tuesday, February 20th.
We will respond to emails upon our return. Have a wonderful day.

When everything goes right, looking through the microscope at your immunofluorescently-stained tissue is no less beautiful than peering through a telescope at the night sky. Unfortunately, experimental issues can obscure that pristine view of your microscopic “galaxy” so much that that you can’t tell the difference between Halley’s Comet and the Big Dipper! Never fear, cellgazer: in a recent webinar in the Technique Talks series from The Scientist University, Dr. Craig Pow of Vector Laboratories shared tips and tricks that will have you ooh-ing and aah-ing at the brilliant universe of your slides.

Background signal and autofluorescence are two common problems that dull the sharpness of immunofluorescence (IF). Both these troublemakers can get in the way of your goal, which Dr. Pow sums up as “a clear, unambiguous, unequivocal view of the target antigen or antigens that you’re looking for”. As you troubleshoot your way through these obstacles to dazzling staining, remember to remain flexible. Researchers like you frequently experience a variety of different issues with IF, even within the same tissue block. This can be due to problems with fixation or to heterogeneity in the molecular makeup of the tissue, which can include macromolecules, Fc receptors, vascularization, or inflammation. The trick, according to Dr. Pow, is to avoid falling victim to lab dogma: even if your lab has “always done it this way”, it’s time to reexamine every aspect of your workflow.
Background signal typically refers to non-specific staining arising in your sample: signal that is not due to the target antigen. In immunofluorescent staining, this includes visible fluorescence in the same spectral wavelength as your specific detection fluorophore. This interfering background can make it challenging to discern true signal from noise, causing difficulties with visualizing the staining of your target antigen, validating the assay, and avoiding false positives.
To achieve bright and clear staining, Dr. Pow suggests running a set of defined deletion controls, which are a specific subtype of negative controls. Essentially, you create deletion controls by omitting steps of the protocol one at a time to determine the source of the background staining. To begin, you will need to find out if your secondary antibody is causing background signal by leaving out the primary antibody and applying only your secondary, and if you use a tertiary reagent, you should apply both your secondary antibody and the subsequent detection reagent. The background that arises at this stage is typically a sign of species cross-reactivity, inadequate blocking, or inadequate washing.

Species cross-reactivity can occur within the same species (e.g., using a mouse primary antibody on sections of mouse tissue) or between two closely related species (e.g., using a rat primary antibody with mouse specimens). For same species cross-reactivity that causes unexpected non-specific staining, consider changing the species of your primary antibody. This means that if you are using a mouse primary on mouse tissue, you could switch to a rabbit or goat primary. Sometimes, however, this may not be possible – perhaps your primary antibody is only available in the same species as your specimen. In that case, Vector Laboratories has your back: to significantly reduce this type of background staining try our M.O.M.® (mouse on mouse) or H.O.H. (human on human) kits.
Cross-reactivity between two closely related species can be problematic, too. Using a pre-adsorbed reagent, such as a secondary antibody from which any component that reacts specifically with your specimen species has been physically removed, can clear things up. If the cross-reactivity is low (around 3–6%), dilute the secondary antibody in a solution containing serum from the target species, which will “stick” nonspecifically and pull out anything that’s clouding your view. For example, if your guinea pig secondary gives you background signal when you use it on mouse tissue, dilute this secondary in 2–5% mouse serum and incubate for 30-60 minutes prior to application.
Inadequate blocking or buffer washes can also obscure your luminous sample. Dr. Pow reminds would-be cellgazers to block with serum from the same species as your secondary antibody (e.g., if you’re using a rabbit anti-mouse secondary antibody, you would block using serum from rabbit). You’ll need to pay close attention to the dilution of serum and the duration of your blocking step as well. If this step is a real headache, perhaps if you’re juggling lots of different serums to stain multiple target antigens, switching to gelatin or plant-based commercial alternatives, such as Animal Free Blocker®, can save you time and hassle. When the trouble stems from buffer washes, see if you can improve the background with an extra wash or by running your existing washes for a little bit longer. To improve your wash buffer for thick preps and frozen sections, Dr. Pow’s hot tip is to consider adding a detergent, such as Tween 20 or Triton X-100, at a concentration of 0.1–0.5%. This will improve permeabilization and reduce any hydrophobic interactions that might be blurring your vision. Additional, although less likely, potential background signal culprits are high reagent concentrations and the duration or temperature of those incubation steps. To eliminate all these possibilities, confirm that everything is working as expected in your positive control.
Occasionally, you will use a tertiary detection reagent when performing IF. To chase down the origin of the background staining you’ll need to add an extra step, where you omit the primary and secondary antibodies and apply the tertiary reagent directly to your sample. For example, in a protocol using a biotin-conjugated secondary antibody followed by a fluorophore-conjugated streptavidin, apply only the fluorophore-conjugated streptavidin. If you still see a fluorescent signal with this deletion control, suggesting that your tertiary detection reagent may be binding to endogenous biotin activity in the prep, you can address the issue with appropriate (strept)avidin/biotin blocking steps.
At the point where you seem to have eliminated other conceivable sources of background signal, it’s time to add your primary antibody back into your workflow! If you find that it’s still making things hazy, confirm that your primary antibody has been validated and purified, paying special attention to the recommended titer, diluent, and incubation. If necessary, perform additional troubleshooting using your positive control tissue. If you’re using antibodies that weren’t commercially generated, you’ll need to perform a few additional steps: 1) run a titer series to figure out the optimal dilution (determined by the signal-to-noise ratio), 2) dilute the antibody in serum (from the same species in which the secondary was raised) along with a little detergent (using Dr. Pow’s favorite, ~0.1% Tween 20), and 3) incubate the secondary antibody with serum from the same species as your specimen to pull out any “sticky” components that nonspecifically bind your target tissue. If these steps reduce your background, it could mean clear skies from here on out!
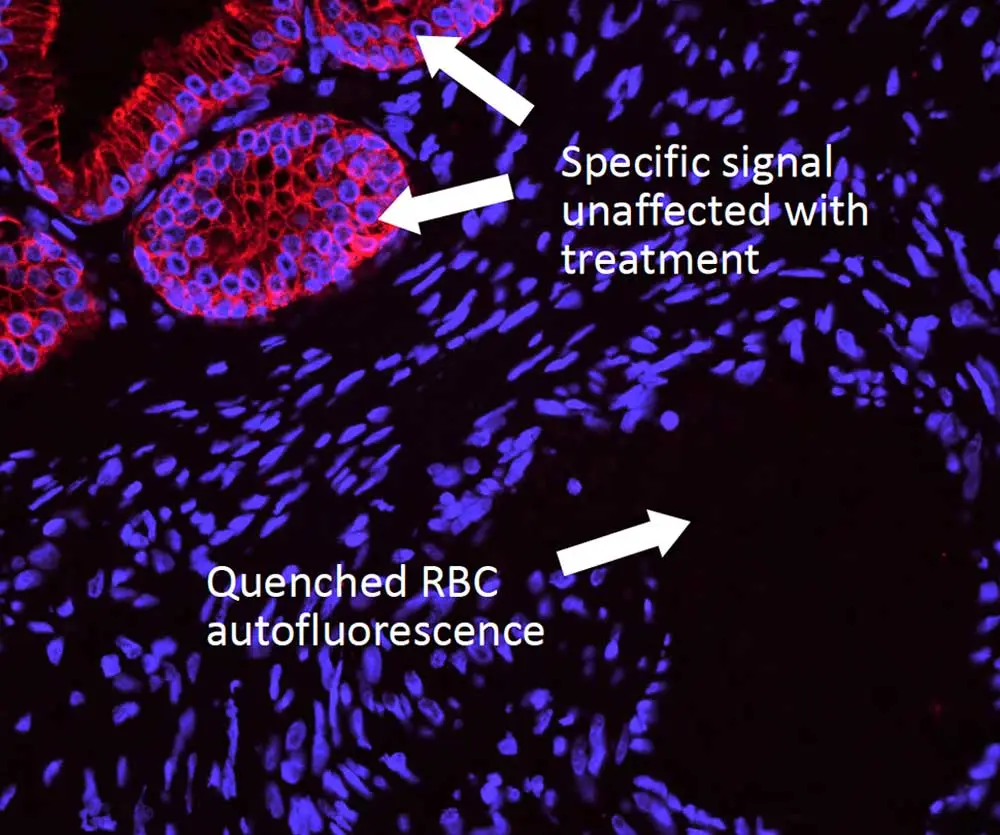
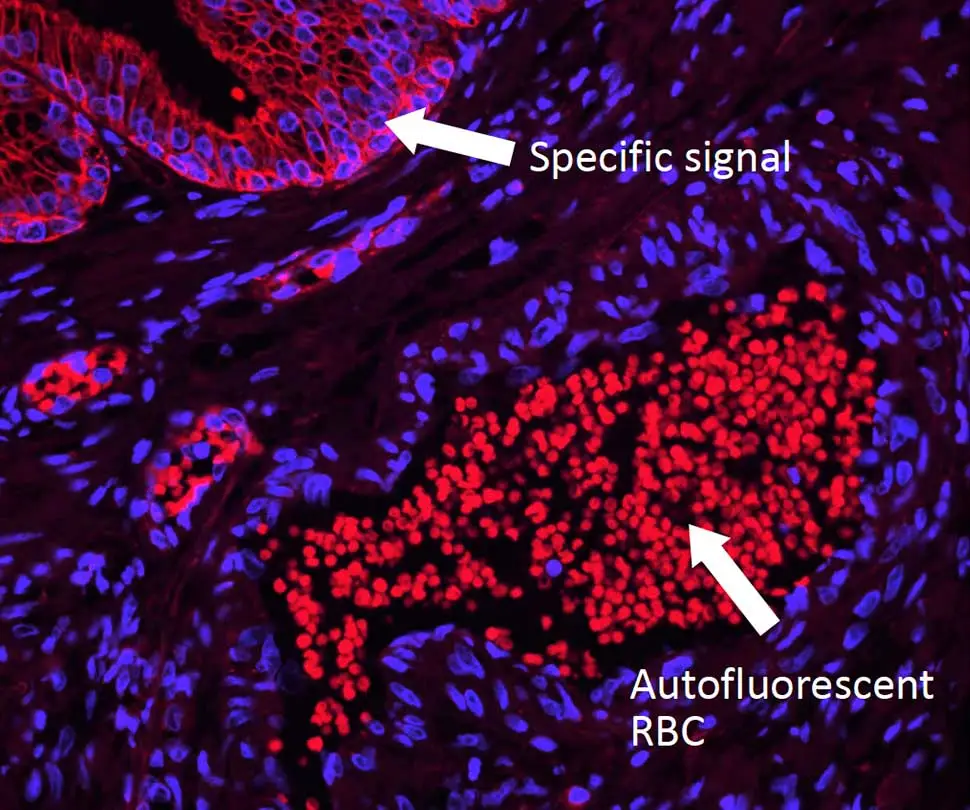
However, you may still run into issues from autofluorescence, which can dull the radiance of any microscopic universe and turn it into a clouded cellular nebula. Dr. Pow has tips to help you tackle autofluorescence, too. Unlike background signal, autofluorescence is inherent to the specimen and can arise from aspects of your prep that are endogenous (collagen, elastin, red blood cells, etc.) or reagent-related (glutaraldehyde, formalin, etc.). This type of fluorescence is typically present across the spectrum, so don’t be tempted to simply use a different fluorophore. Instead, you will need to quench this foe to restore the luster to your sample. But beware: you’ll need to choose your reagent carefully. Some common (but imperfect) options include copper sulfate (which washes off easily), ink-based reagents (which are ineffective against many autofluorescent tissue elements), and sodium borohydride (which bubbles and does nothing against the notoriously tricky red blood cells). Dr. Pow recommends the TrueVIEW® Autofluorescence Quenching Kit because it completely drops out autofluorescence from both endogenous and reagent-based elements, making it an ideal solution for non-lipofuscin sources.


Enjoy your cellgazing! And for more helpful tips and tricks be sure to check out our IF Resource Guide.


Stay in the Loop. Join Our Online Community
Together we breakthroughTM

©Vector Laboratories, Inc. 2024 All Rights Reserved.