Click-&-Go® Magnetic Beads Conjugation Kit
Product No. 1508
Introduction
The Click-&-Go® Magnetic Beads Conjugation Kit allows antibodies to be covalently attached to high quality 1 μm magnetic particles efficiently, quickly and easily using proprietary technology developed by scientists at Click Chemistry Tools. The conjugation reaction is initiated simply by the activation of the magnetic beads followed by briefly agitating the activated beads with an antibody which becomes attached (via lysine residues) to the magnetic particles. It takes only a few minutes to set up the conjugation, and the covalent conjugate is ready to use within 3 hours or less. Our kit provides enough material for 3 conjugations of 100 μg of antibody to 1.5 mg of the magnetic beads.
Kit Contents
| Component | Concentration | Amount |
|---|---|---|
| Magnetic Beads (Component A) | 10 mg/mL | 3 × 150 µL |
| 4 × Activation Buffer (Component B) | 1 mL | |
| Additive 1 (Component C) | 6 vials, 1 mg | |
| Quench Buffer (Component D) | 1.5 mL | |
| Sodium bicarbonate (Component F) | 80 mg | |
| Desalting columns | 3 columns |
Materials Required but Not Provided
- Magnetic stand
- 1.5 mL microfuge tubes
- PBS (pH 7.4), storage buffer
Antibody Preparation
- For the most effective reaction, the protein should be in a buffer that is free of primary amines and ammonium ions, as they compete with the amine groups of the protein to bind to the magnetic beads. The presence of low concentrations of sodium azide (<3 mM or 0.02%) or thimerosal (<1 mM or 0.04%) will not interfere with the reaction. Antibodies stabilized with bovine serum albumin (BSA) or gelatin will not label well. In such cases, for purification of antibodies, one can use commercially available kits such as Abcam Antibody Purification Kit (Protein A) (ab102784), GOLD antibody purification kit (ab204909), Antibody Purification Kit (Protein G) (ab128747), or the BSA Removal Kit (ab173231).
- Antibodies stabilized with glycerol will not label well; for solutions containing ≤ 10% glycerol – use provided desalting columns. For more glycerol-concentrated solutions, dilute to ≤ 10% glycerol and use provided desalting columns or use dialysis.
- We recommend adding 30 μg of antibody per vial in the first instance. A range of 10 μg to 50 μg has been shown to work with reference antibodies, ideally in a volume of 100 μL (i.e. concentration range is 0.1-0.5 mg/mL).
- The optimum antibody concentration is 0.5-1 mg/mL.
- The capacity of the beads is usually 60-65 ug antibody per 1 mg of beads. More or less beads may be used depending on antibody amount. The procedure can be easily scaled up or down.
Material Preparation
| Activation Buffer | Prepare a 1 × solution of Activation Buffer: add 0.1 mL of 4 × Activation Buffer to 0.3 mL of DI water, vortex briefly. |
| Sodium bicarbonate 1 M | Prepare a 1 M solution of Sodium Bicarbonate by adding 1 mL of DI water to the tube, vortex briefly. |
1. Protein Preparation
- If the antibody is lyophilized and free of exogenous amines (e.g. glycine or Tris), resuspend in 100 µL PBS buffer (pH 7.4) to obtain a 1 mg/mL solution. Proceed to Immobilization Step.
- If the antibody is already in 100 µL buffer (e.g. PBS) that might contain exogenous amines (e.g. glycine or Tris), for optimal results it is best to buffer exchange the antibody into PBS (pH 7.4) using the spin columns provided prior to proceeding to the Immobilization Step.
- If the antibody solution contains more than 10% glycerol, dilute to ≤ 10% and use the provided desalting columns. For ≥ 10% glycerol you may also use dialysis if dilution is undesirable.
2. Spin Column Equilibration into PBS (pH 7.4) prior to Buffer Exchange
- Twist off the column’s bottom closure and loosen the cap. Place each 0.5 mL spin column into a clean 1.5 mL microfuge tube.
- Centrifuge column at 1,500 × g for 2 minutes to remove storage solution. With a pen, mark on the side of the column where the compacted resin is slanted upward. Place column in centrifuge with the mark facing away from the center of the rotor in all subsequent centrifugation steps.
Note: resin will appear white in color and compacted after centrifugation. - Add 0.3 mL PBS (pH 7.4) to the top of each spin column, replace the cap and loosen.
- Centrifuge at 1,500 × g for 2 minutes to remove buffer.
- Repeat steps 3 and 4 two additional times, discarding buffer from collection tube after each spin.
- Transfer equilibrated spin column (resin appears white and dry) into a new 1.5 mL microfuge tube and immediately proceed to the buffer exchange of the protein.
Buffer Exchange of the Protein
- Buffer exchange the protein into a PBS (pH 7.4) equilibrated spin column by slowly applying 100 µL of the protein solution to the center of the equilibrated resin bed.
- Centrifuge at 1,500 × g for 2 minutes. Retain the eluate at the bottom of the 1.5 mL collection tube.
- The protein is now buffer exchanged and ready for the Immobilization Step.
3. Immobilization Step
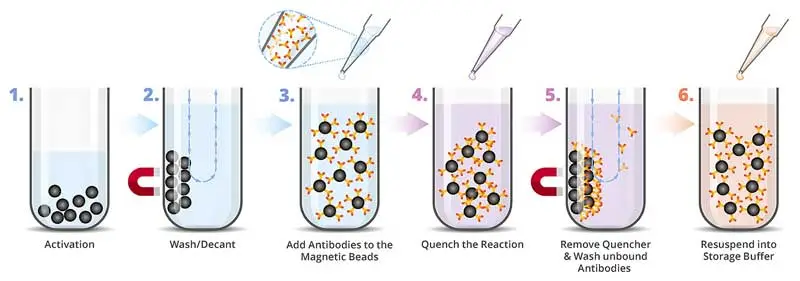
The Immobilization Step is initiated by the activation of the magnetic beads followed by briefly agitating the activated beads with an antibody which becomes attached (via lysine residues) to the magnetic particles. A schematic representation of the immobilization procedure is shown in Figure 1.

Figure 1. Schematic representation of protein immobilization procedure
The optimal pH for the IgG conjugation reaction is 8.0 – 8.5. To obtain this pH in the antibody solution, add 1/10 V/V of 1M Sodium Bicarbonate (see material preparation) to the antibody solution.
- Add 500 µL of 1 × Activation Buffer to Additive 1, pipet the solution up and down or vortex until solid is completely dissolved.
- Immediately add this solution to the Magnetic Beads vial. Vortex briefly to mix.
- Rotate end-over-end on sample rotator or shaker for 60 minutes.
- Place the tube on a magnetic stand for 60 seconds. Carefully aspirate the supernatant, leaving settled magnetic beads in the tube. Take care not to aspirate settled beads.
- Wash the beads by adding 500 µL of PBS. Place the tube on a magnetic stand for 60 seconds, then carefully aspirate the supernatant, leaving settled magnetic beads in the tube. Take care not to aspirate settled beads.
- Add 50-100 µL antibody to the settled magnetic beads, vortex briefly to mix.
- Rotate end-over-end on sample rotator for at least 120 minutes, up to overnight.
- Add 200 µL of Quench Buffer, vortex briefly to mix.
- Rotate end-over-end on sample rotator or shaker for 30 minutes.
- Place the tube on a magnetic stand for 60 seconds, then carefully aspirate the supernatant, leaving settled magnetic beads in the tube. Take care not to aspirate settled beads.
- Wash the beads by adding 500 µL of PBS or any other suitable buffer, mix thoroughly.
- Place the tube on a magnetic stand for 60 seconds, then carefully aspirate the supernatant, leaving settled magnetic beads in the tube. Take care not to aspirate settled beads.
- For storage of the antibody-beads, add 100 µL of PBS or any other buffer which is suitable for antibody storage, mix thoroughly. For extra blocking, add BSA up to 0.1% final concentration. Dilute further as required. Optionally, add preservative to the conjugate.

